
There’s something truly magical about baking with sourdough, and it all begins with a good sourdough starter recipe. When I first started my baking journey, I had no idea how important this little concoction would become in my kitchen. A homemade sourdough starter is like a living, breathing thing – it transforms simple ingredients into something extraordinary! Every time I feed my starter, I feel a connection to the age-old tradition of bread-making, where patience and care yield delicious results. Trust me, there’s nothing quite like the aroma of fresh sourdough wafting through your home. Plus, creating your own starter is not only rewarding but also cost-effective compared to store-bought options. You get to control the ingredients, ensuring everything is fresh and natural. So, let’s dive into the wonderful world of sourdough and get your starter bubbling away! It’s easier than you might think!
Ingredients for Sourdough Starter Recipe
To create your very own sourdough starter, you’ll need just two simple ingredients. Here they are:
- 1 cup all-purpose flour: Make sure to use good quality flour; it makes a difference! You can also experiment with different flours later, but starting with all-purpose is the way to go.
- 1 cup water: Use room temperature water for the best results. If your tap water is heavily chlorinated, consider using filtered water instead to avoid any interference with the fermentation process.
That’s it! With just these two ingredients, you’re on your way to creating a bubbly, active sourdough starter that will elevate your baking to new heights!
How to Prepare the Sourdough Starter Recipe
Getting your sourdough starter up and running is a straightforward process, and I promise, it’s totally worth it! Just follow these simple steps, and before you know it, you’ll have a thriving starter ready to make delicious bread.
Mixing the Ingredients
Start by grabbing a medium bowl. Measure out 1 cup of all-purpose flour and 1 cup of water. Now, this is where the fun begins! Combine both ingredients in the bowl and mix them together with a wooden spoon or spatula. You want to really get in there until there are no dry spots left – it should look like a thick, sticky batter. Trust me, this step is crucial because it ensures that your flour is fully hydrated, which is essential for the fermentation process to kick off!
Letting the Starter Sit
Once everything is mixed, it’s time to let your starter do its magic. Cover the bowl with a clean cloth or plastic wrap – this keeps out unwanted dust and pests while allowing the starter to breathe. Now, find a warm spot in your kitchen (around 70-75°F is ideal) and let it sit at room temperature for about 24 hours. During this time, you might not see much action, but that’s perfectly okay! Just give it time to start developing those wild yeasts.
Feeding the Starter
After the first 24 hours, it’s time for the first feed! Discard half of your starter (about 1 cup) – I know it feels wasteful, but this keeps your starter healthy and allows it to grow. Then, add another 1 cup of all-purpose flour and 1 cup of water to the remaining starter. Mix it all together again until there are no dry spots. Cover it up and repeat this feeding process every 24 hours. Consistency is key here, so try to stick to a routine!
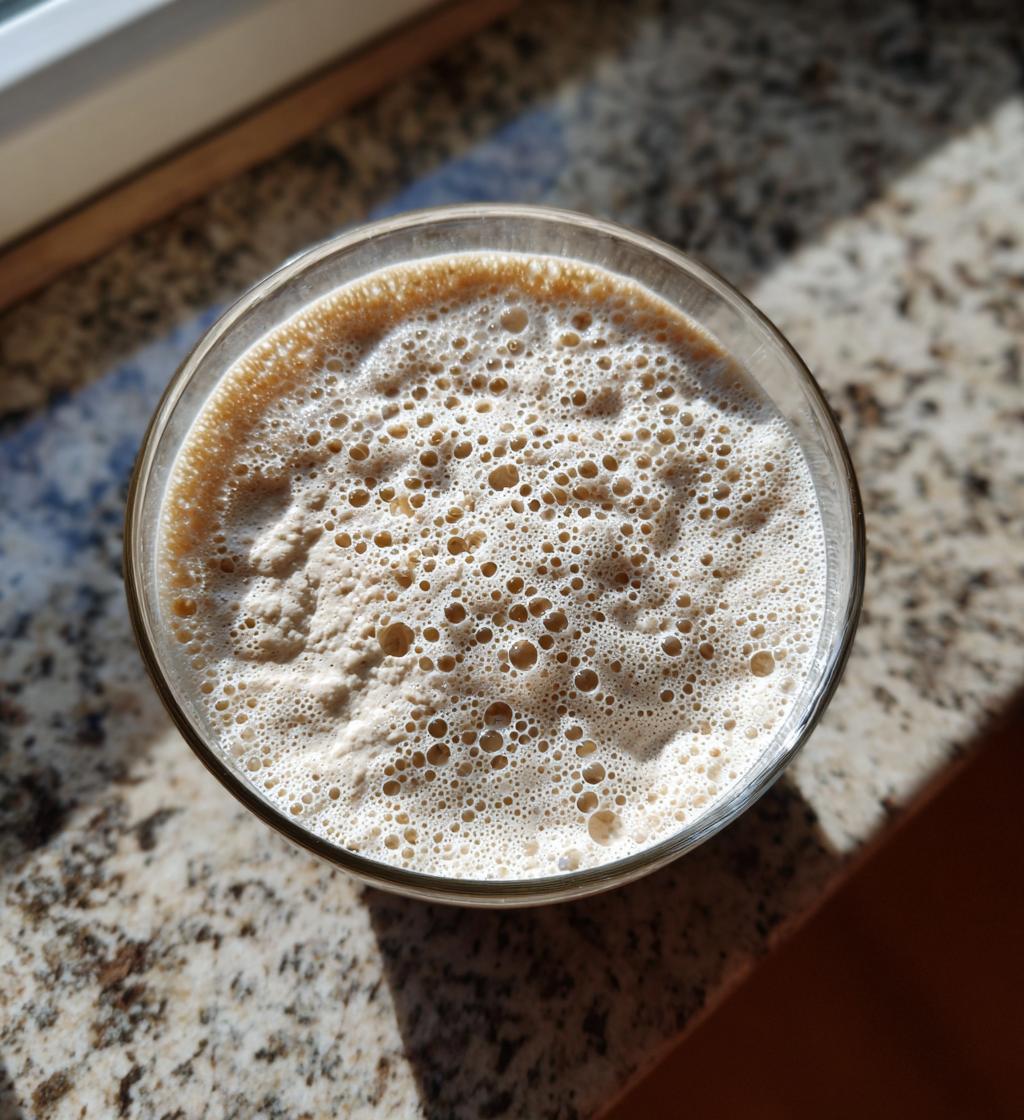
Observing the Starter’s Progress
As the days pass, keep an eye on your starter. You’re looking for bubbles to form and the mixture to rise in the bowl. Typically, you’ll start to see signs of life around day 3 or 4, but it can take up to 7 days for your starter to become fully active. When it starts to double in size and has a tangy aroma, you know you’re on the right track! This bubbly, frothy mixture is your ticket to amazing sourdough bread!
Tips for Success with Your Sourdough Starter Recipe
Maintaining a healthy sourdough starter is key to successful baking, and I’ve learned a few tricks along the way that can help you out! First and foremost, always use a clean container when you’re feeding your starter. This helps prevent unwanted bacteria from affecting its growth. I like to use glass jars because I can easily see the bubbles forming and the starter rising!
Consistency is vital, so try to feed your starter at the same time every day. Set a little reminder if you need to! And don’t forget to discard half of the starter before each feeding – it may feel wasteful, but this keeps the balance right and encourages a robust culture.
If you notice your starter isn’t bubbling as much as it should, try moving it to a warmer spot in your kitchen. Sometimes, a little extra warmth can really get those yeasts excited! Happy baking!
Nutritional Information
Understanding the nutritional content of your sourdough starter is super helpful, especially if you’re mindful of what you’re eating. Keep in mind that these values are estimates based on a serving size of 1/4 cup of starter. Here’s a quick breakdown:
- Calories: 100
- Fat: 0g
- Protein: 3g
- Carbohydrates: 22g
- Sugar: 0g
- Fiber: 1g
- Sodium: 0mg
These numbers show that your homemade sourdough starter is low in fat and sugar while providing a good source of carbohydrates and protein. It’s a nutritious base for all your baking adventures!
FAQ about Sourdough Starter Recipe
Starting your sourdough journey can lead to a few questions, and I’m here to help! Here are some of the most common queries I’ve encountered along the way.
How Long Does It Take for the Starter to Be Ready?
Patience is key when it comes to waiting for your sourdough starter to become active! Typically, you should start seeing signs of life around day 3 or 4, but it can take up to 7 days for your starter to be fully ready. Look for those bubbly formations and a nice rise in the mixture. When it starts doubling in size and has that delightful tangy aroma, you know you’re on the right track! So, hang in there; the wait is worth it!
Can I Use Whole Wheat Flour?
Absolutely, you can use whole wheat flour for your sourdough starter! In fact, whole wheat flour can add a lovely nuttiness and enhance the fermentation process because it contains more nutrients than all-purpose flour. However, be aware that it may produce a slightly denser starter. If you start with whole wheat, you can eventually switch to all-purpose flour once your starter is established. Feel free to experiment and see what flavor profiles you enjoy the most!
What Should I Do If My Starter Smells Bad?
If your starter develops an unpleasant odor, it could be a sign that it’s not happy. A healthy sourdough starter should smell tangy and slightly sweet. If it smells off, first check if there’s any discoloration or mold; if you see any, it’s best to discard it and start over. If it just smells sour, try feeding it more frequently and ensuring it’s in a warm spot. Sometimes, just a little extra care can bring it back to life!
Why You’ll Love This Sourdough Starter Recipe
This sourdough starter recipe is a game changer for any home baker! Here’s why you’ll absolutely adore it:
- Easy Preparation: With just two ingredients and a few simple steps, you can get started without any fuss!
- Cost-Effective: Making your own starter saves you money compared to buying commercial options, plus you know exactly what goes into it.
- Creative Freedom: Once your starter is active, the possibilities are endless! You can experiment with different breads and flavors.
- Connection to Tradition: There’s something incredibly rewarding about nurturing your own starter, connecting you to the age-old art of sourdough baking.
- Delicious Results: You’ll enjoy the rich, tangy flavor of fresh sourdough bread that you made from scratch!
Trust me, once you start this journey, you’ll never look back!
Print
Sourdough Starter Recipe: 5 Steps to Magical Bread
- Total Time: 7 days
- Yield: 1 sourdough starter 1x
- Diet: Vegan
Description
A simple recipe to create your own sourdough starter.
Ingredients
- 1 cup all-purpose flour
- 1 cup water
Instructions
- Combine flour and water in a bowl.
- Mix until there are no dry spots.
- Cover the bowl with a cloth and let it sit at room temperature.
- Feed the starter with equal parts flour and water every 24 hours.
- Wait for bubbles to form and the starter to rise.
Notes
- Use a clean container each time you feed.
- Discard half of the starter before feeding.
- It may take 5-7 days to become active.
- Prep Time: 10 minutes
- Cook Time: 0 minutes
- Category: Baking
- Method: Fermentation
- Cuisine: American
Nutrition
- Serving Size: 1/4 cup
- Calories: 100
- Sugar: 0g
- Sodium: 0mg
- Fat: 0g
- Saturated Fat: 0g
- Unsaturated Fat: 0g
- Trans Fat: 0g
- Carbohydrates: 22g
- Fiber: 1g
- Protein: 3g
- Cholesterol: 0mg
Keywords: sourdough starter recipe